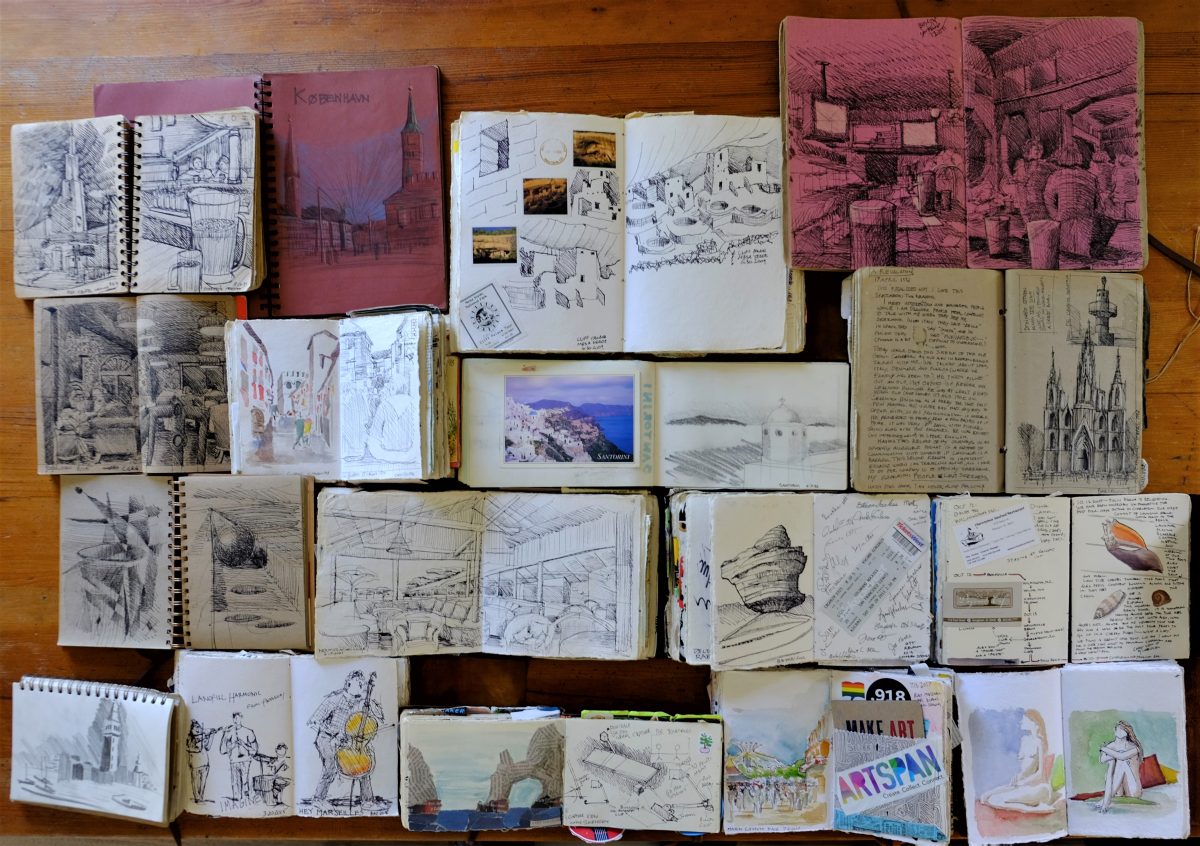
I am excited to announce a new workshop that I will be leading at Mystic Mill Valley in August to teach you how to create 3D interactive sketched stories with Mental Canvas.
As most of my artwork has been in journals, I have always looked for ways to make my artwork come alive digitally. This is a really fun tool for Apple iPads and Windows tablets that I want to share with anyone who wants to tell a story with their pictures. Sign up today for the workshop on August 20, 2026!
This is a series of journaling workshops that Michael Scherotter is leading out of Mystic Mill Valley to give anyone the tools that they need to create rich artistic journals to accompany them on their travels near and afar. After 35 years of filling journalist with artwork, Michael has started to teach his techniques to people who are looking to up their journaling craft.
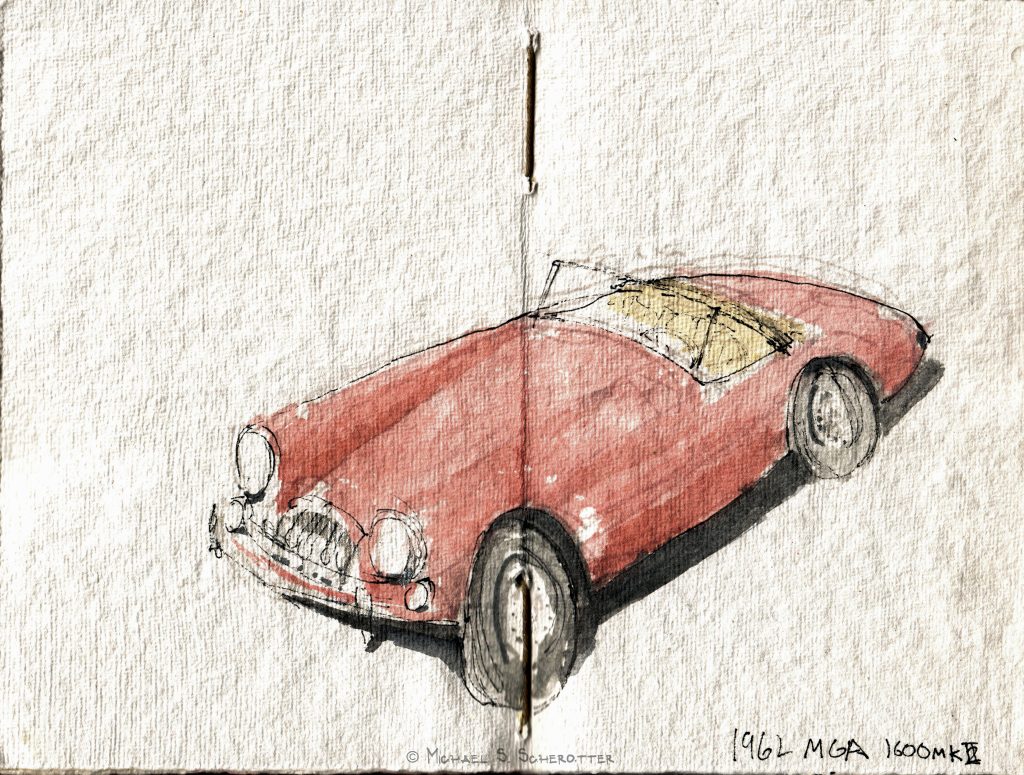
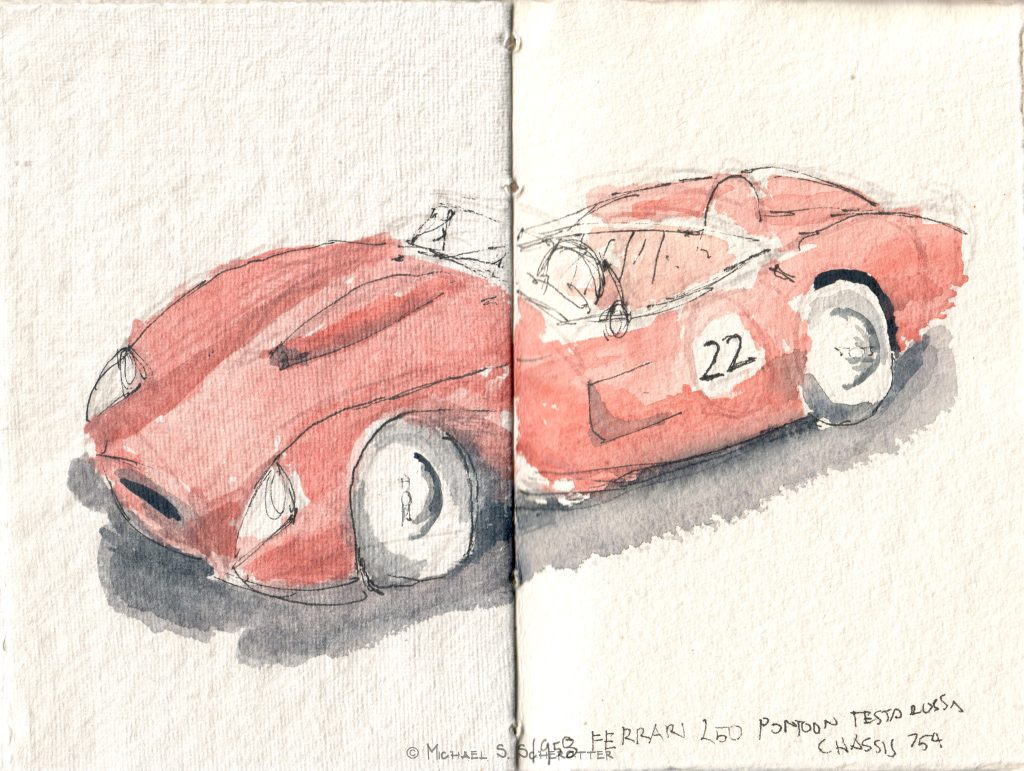
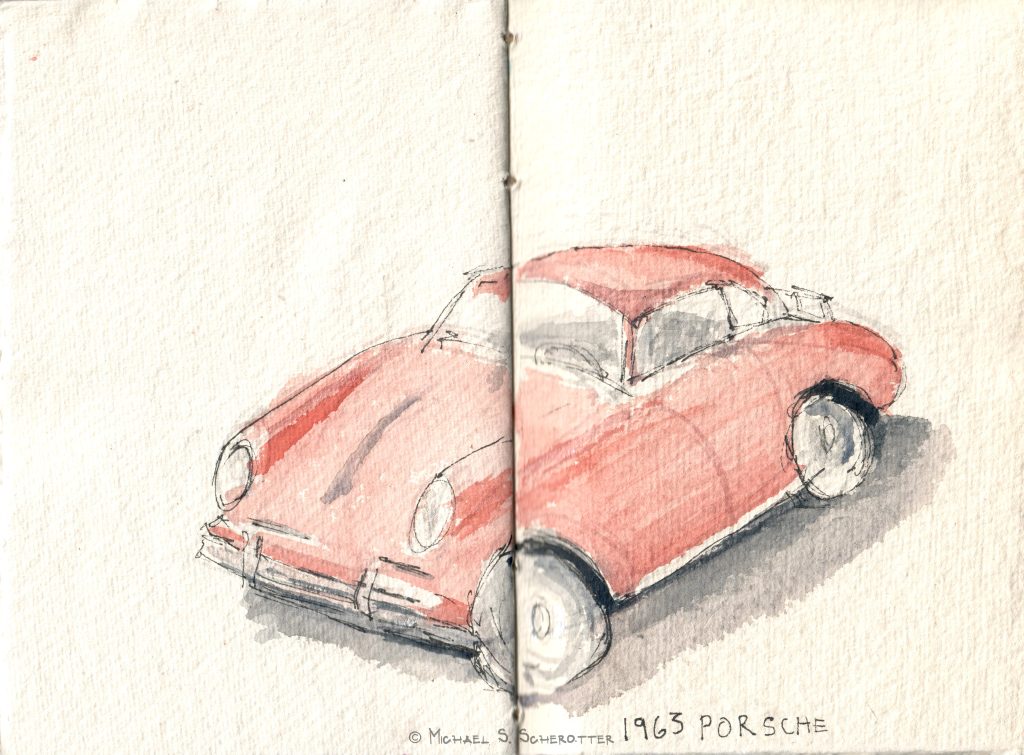
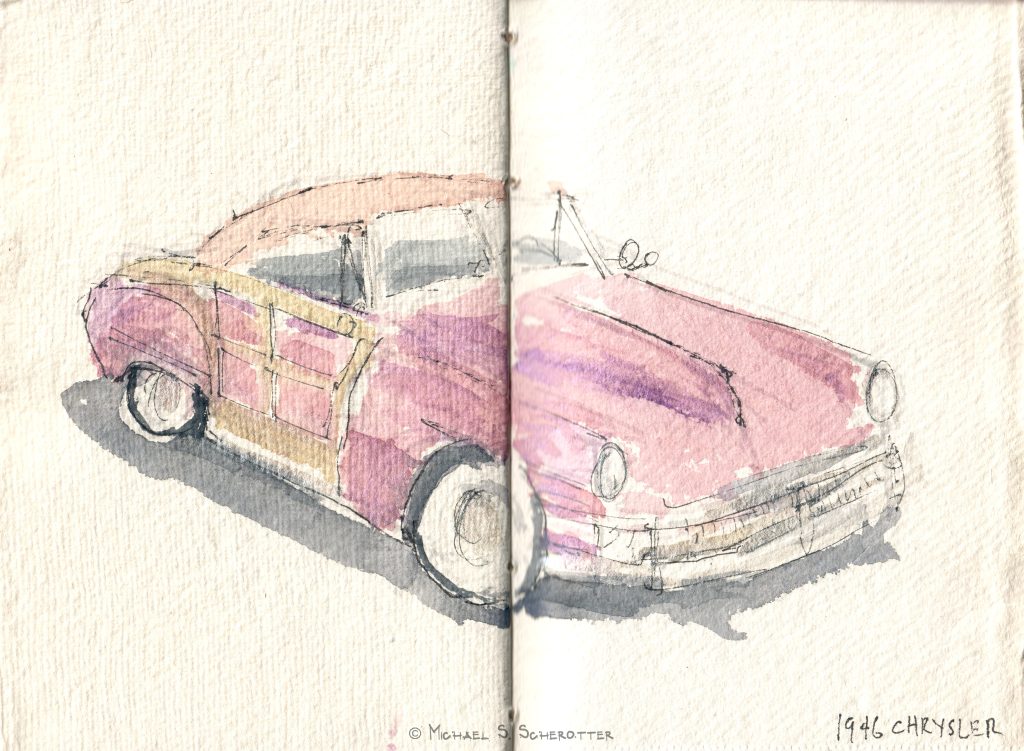
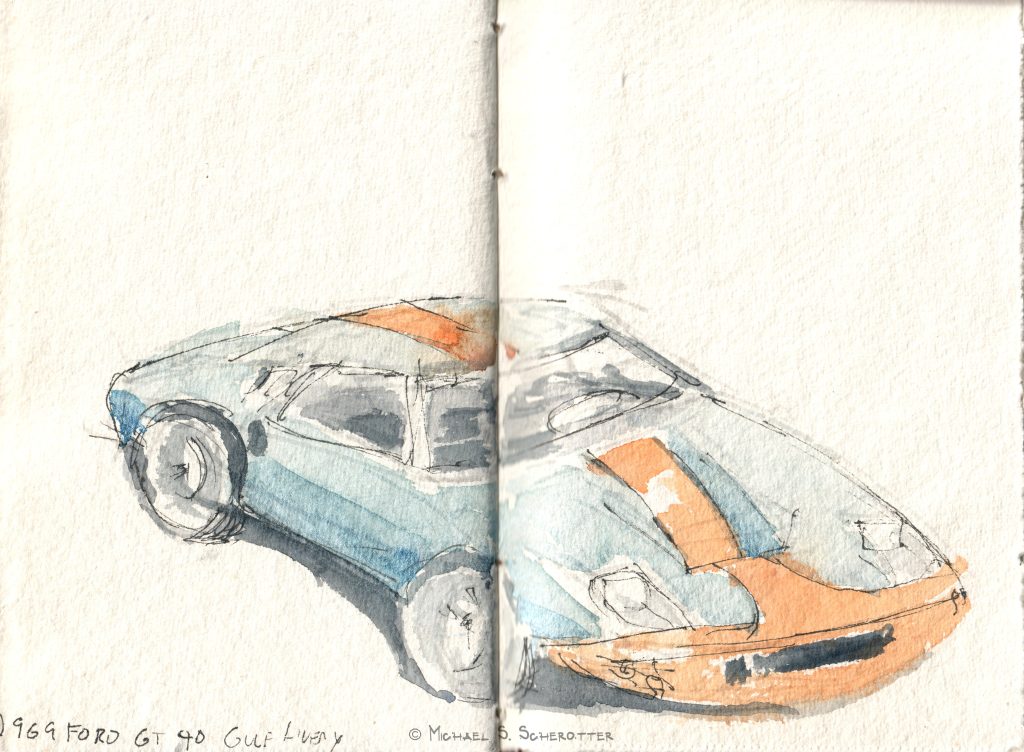
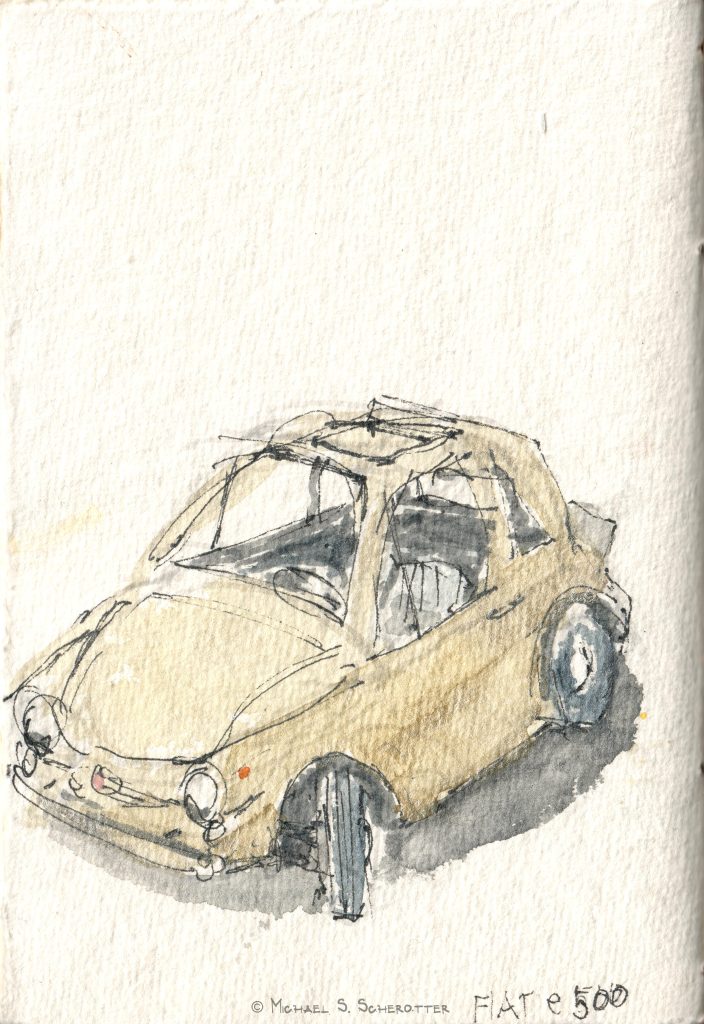
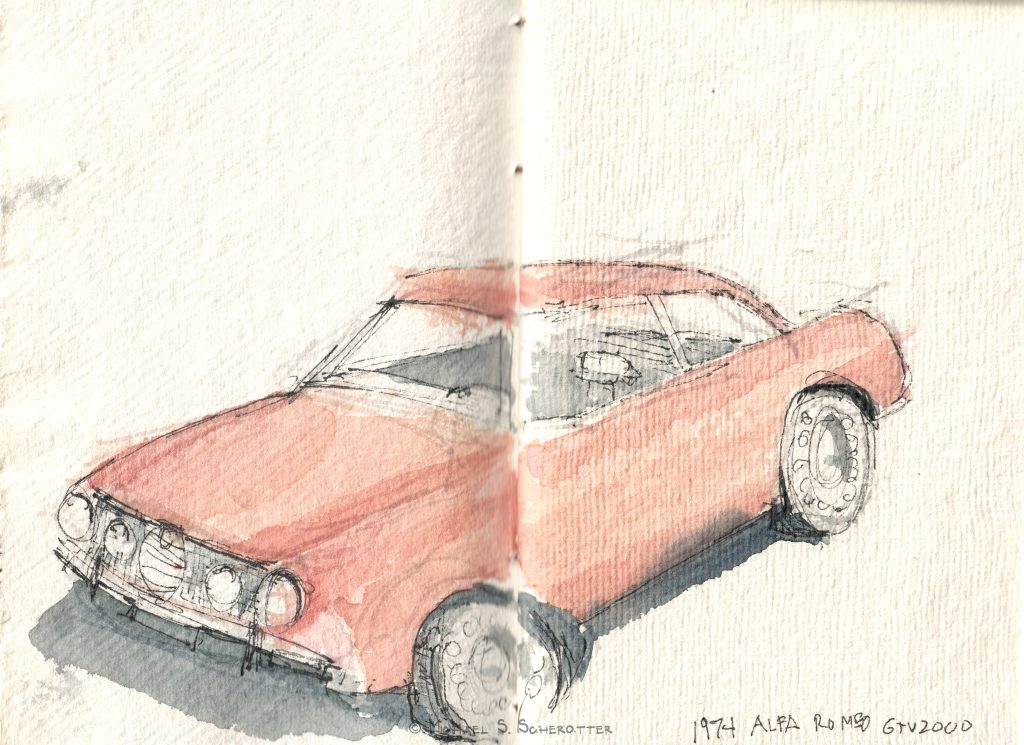
1948 MG TC1962 MGA 1600 MKII1958 Ferrari 250 Pontoon Testa Rossa Chassis 7541963 Porsche1948 Chrysler1969 Ford GT 40 Gulf LiveryFiat e5001962 Abarth1974 Alfa Romeo GTV2000
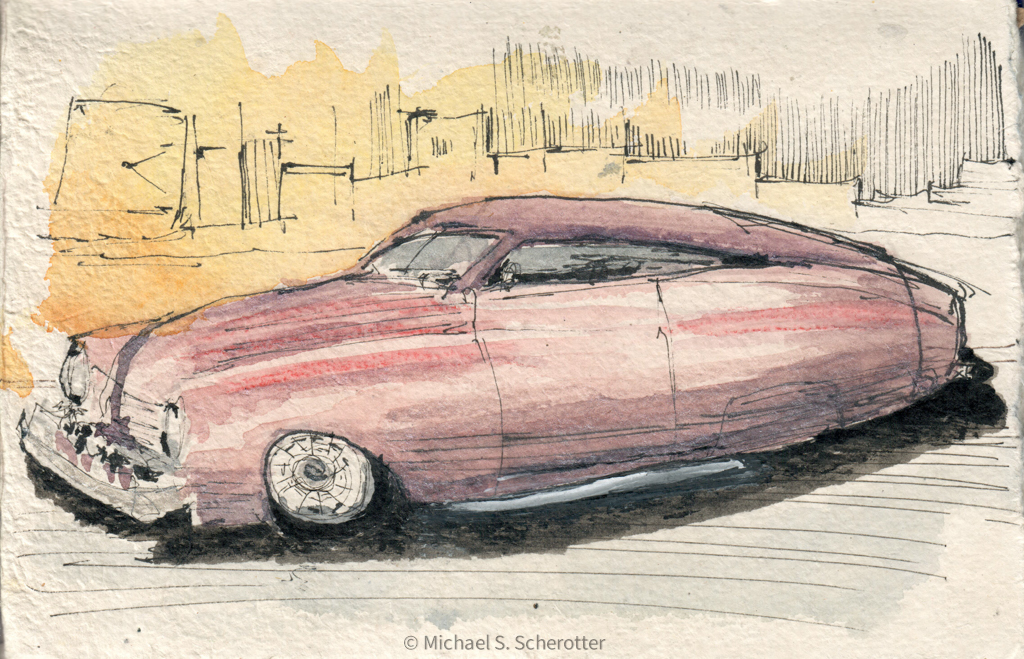
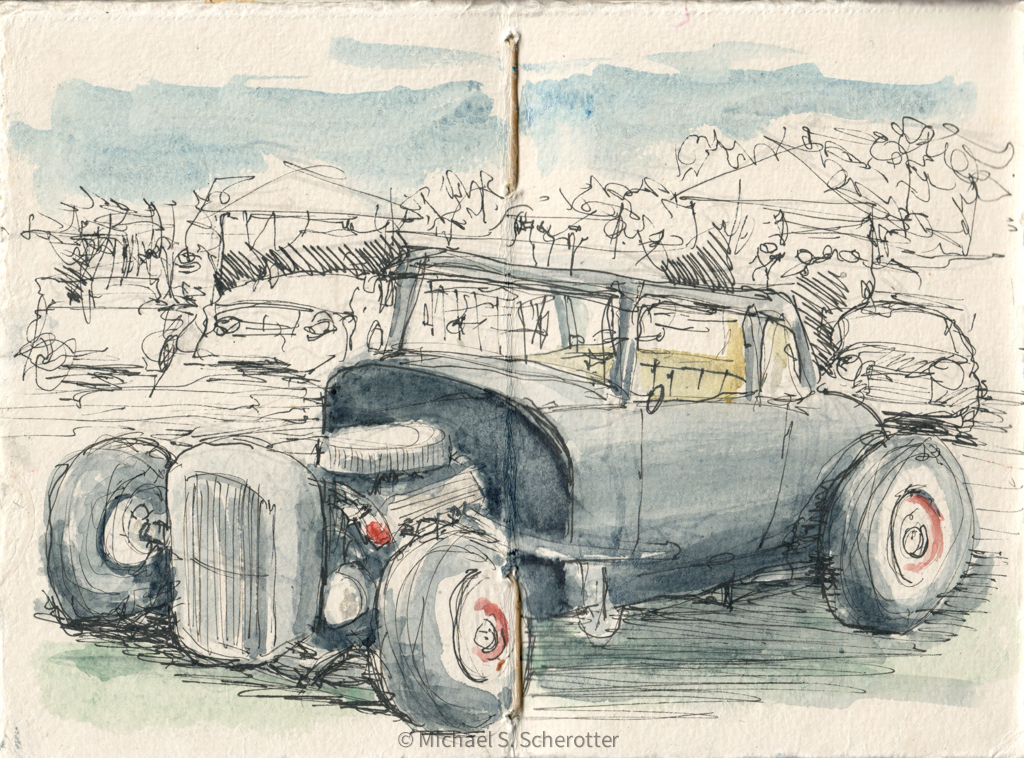
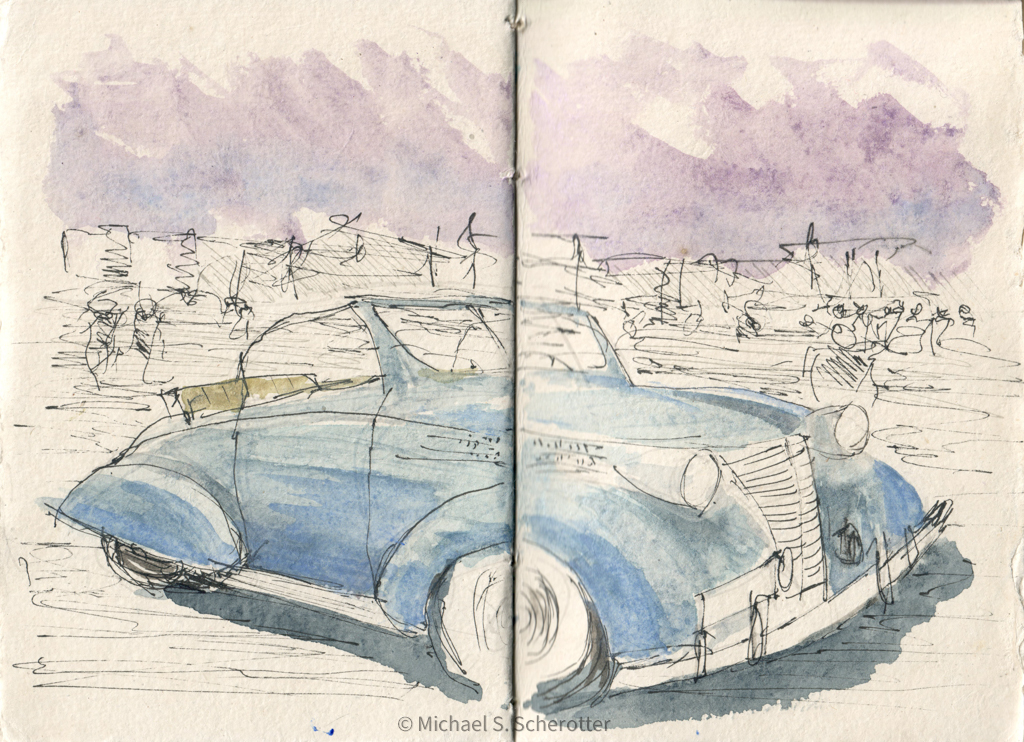
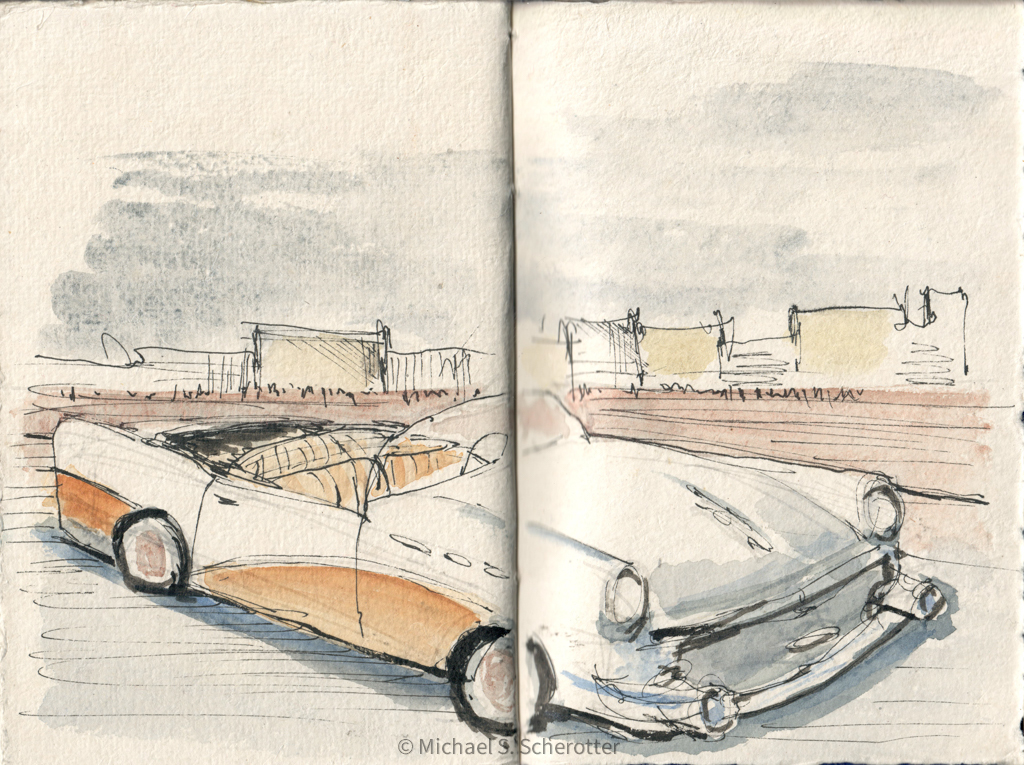
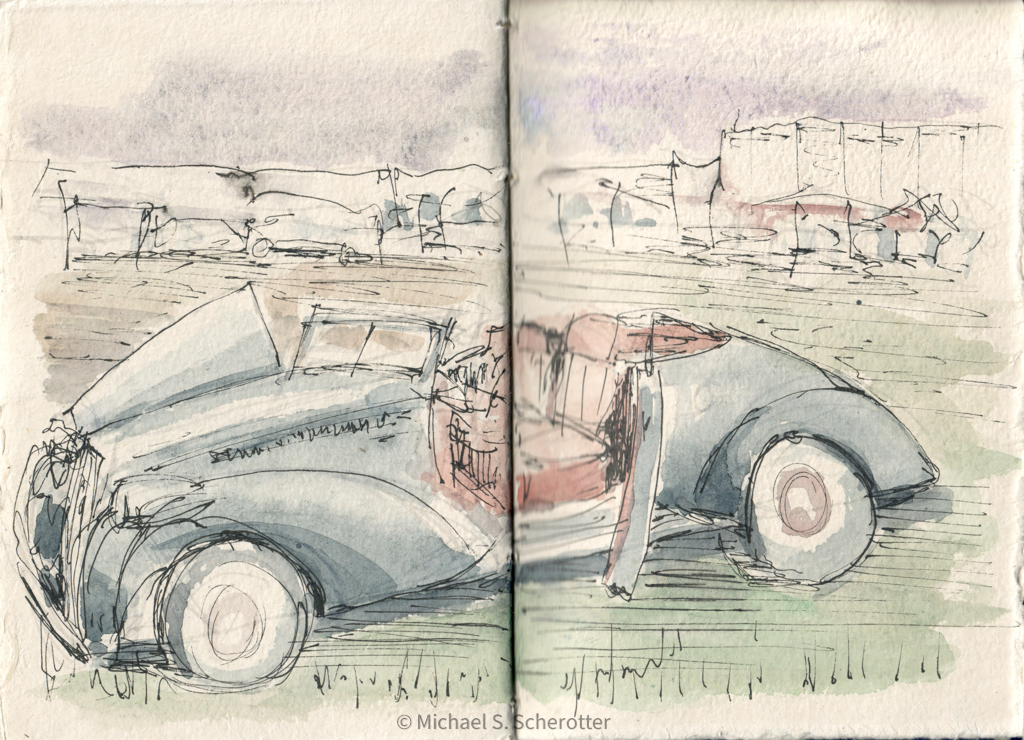
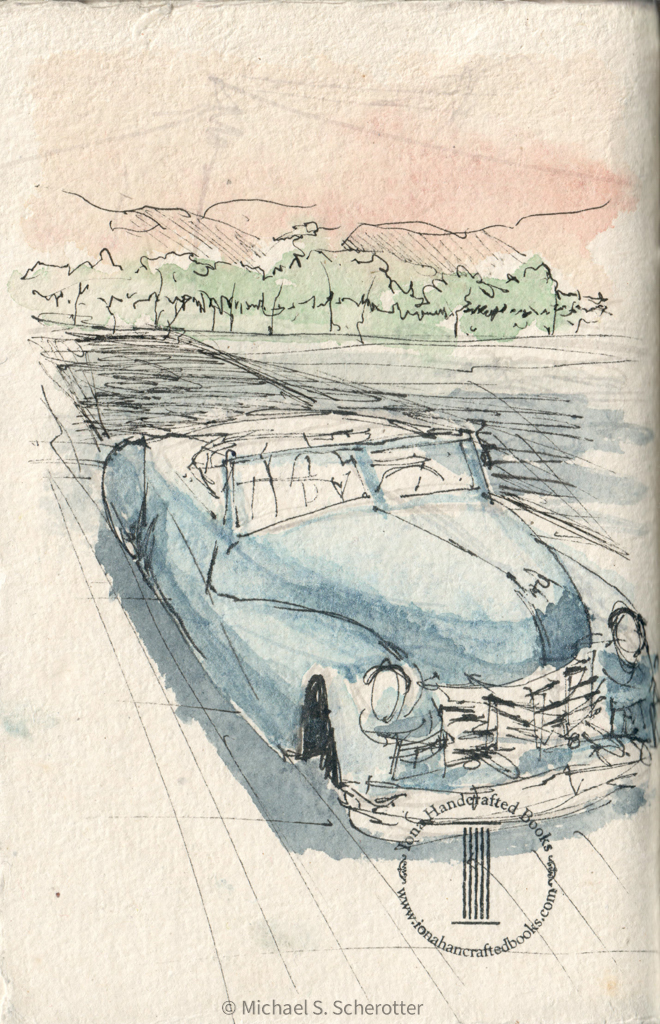
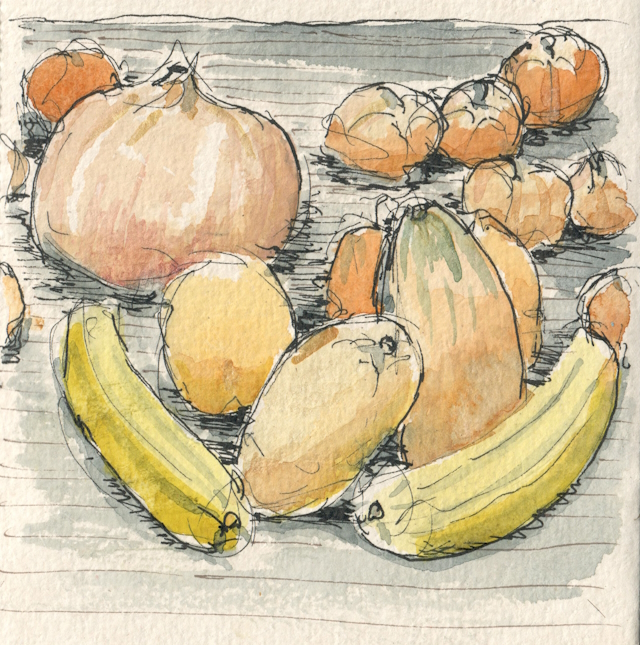
Each watercolor took me between 20-25 minutes in my journal. I start out with a rough sketch using a light gray Tombow dual brush pen, then add color with my watercolors, and then add some linework using a waterproof Pentel Finito pen.
If you have a car and would like a custom watercolor painting of it, please reach out to me – as I do commissions. See details here.
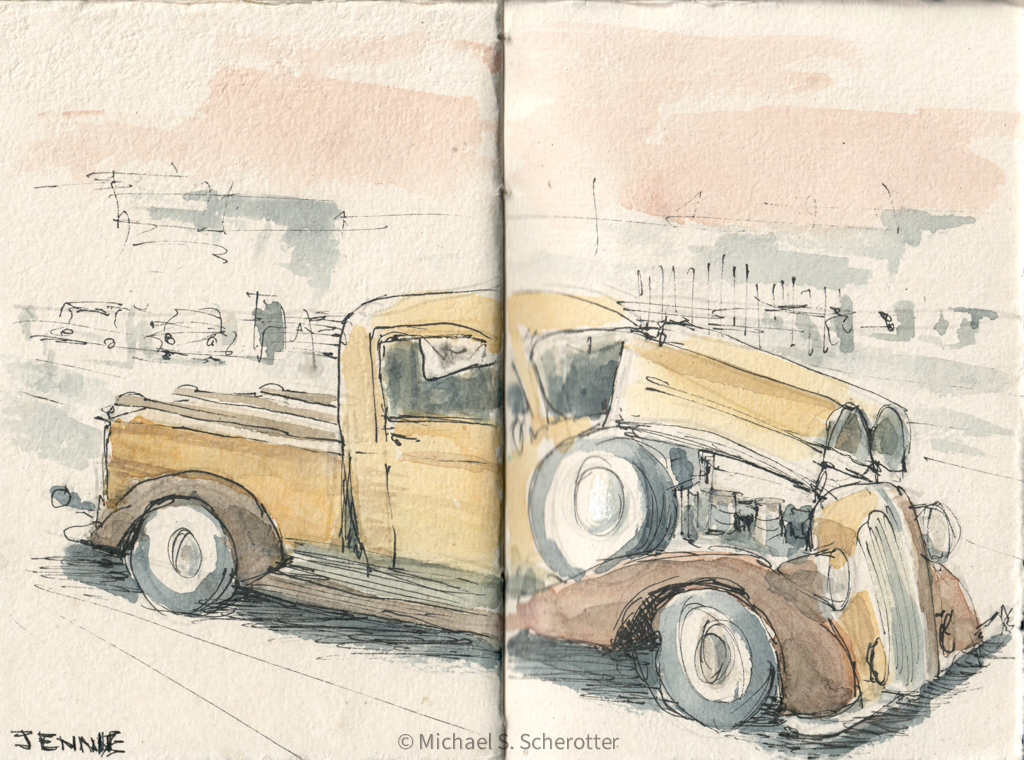
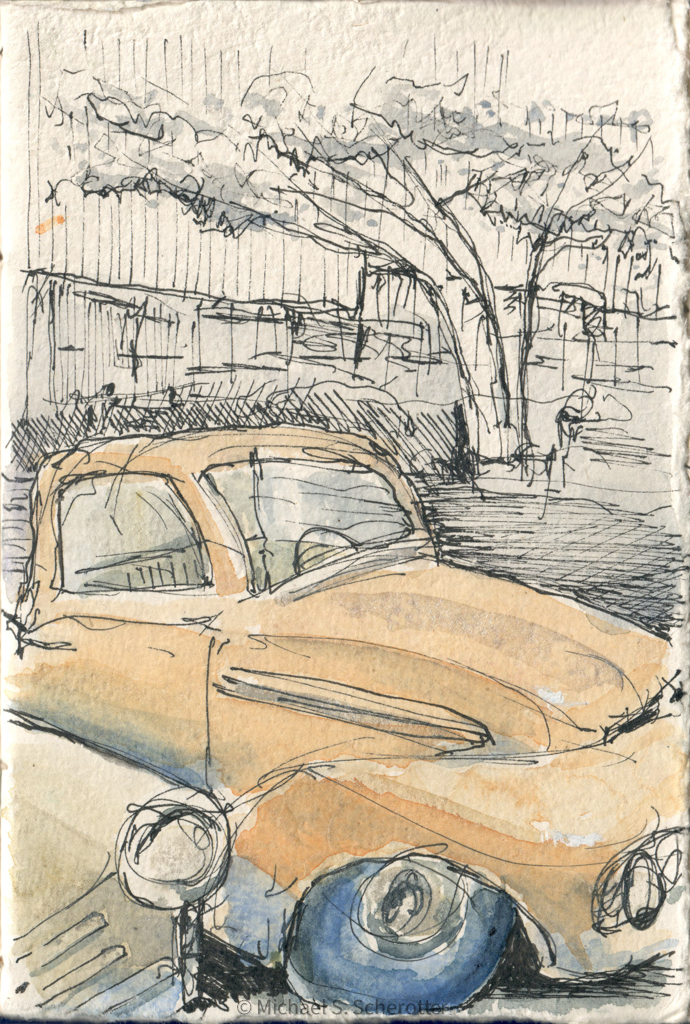
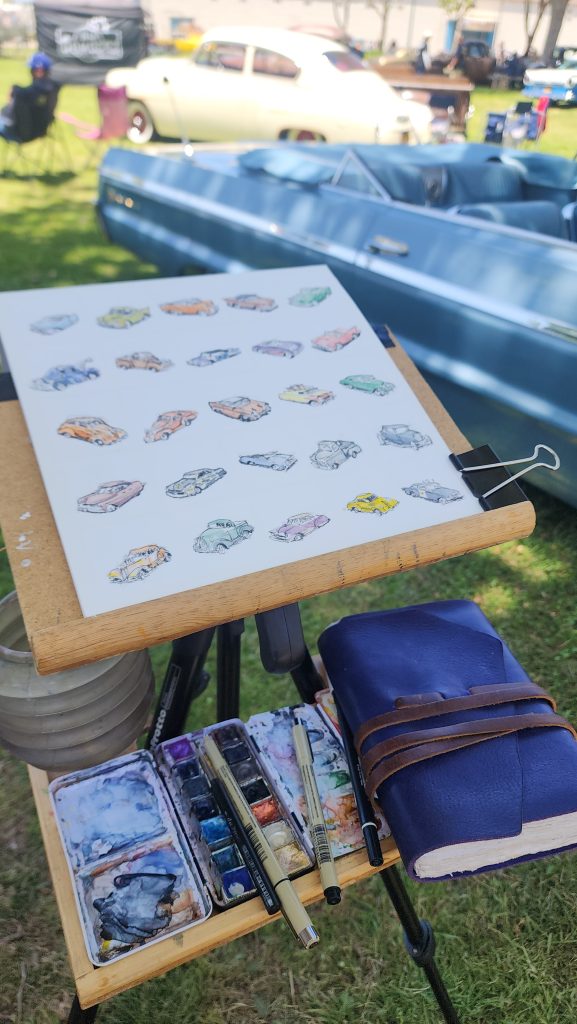
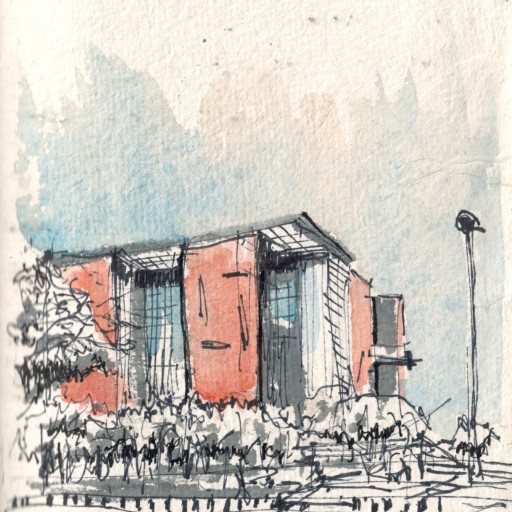
This weekend I went to Santa Maria, California to attend the West Coast Kustoms auto show to paint cars and had a blast! I brought my journal, some watercolor pads, my portable watercolor kit, and homemade easel.
Jennie
This weekend I went to Santa Maria, California to attend the West Coast Kustoms auto show to paint cars and had a blast! I brought my journal, some watercolor pads, my portable watercolor kit, and homemade easel. Wanting the maximum size to paint in my journal, most of the pieces span two pages of my 5×7 Lucca journal.
I did this because I realized that I really liked drawing and painting cars and saw that this show would have tons of unique cars and trucks with amazing details, colors, and history. The design and engineering that went into the cars in addition to the customization that the owners and craftspeople put into them made the cars such an awesome subject. I was also hoping to meet people to see if there was any interest in my new artwork commissioning venture.
I met all kinds of people, many who stood in front of their vintage car or truck with the pride that a parent has in seeing their child succeed. I found trucks and cars that I liked, set up my easel and started painting. Often, the owner of the vehicle would come up to me and we would start talking. When I do watercolor painting there is lots of time to talk while I wait for paint to dry in the sun and I used this as an opportunity to ask the owners to tell the stories behind their cars.
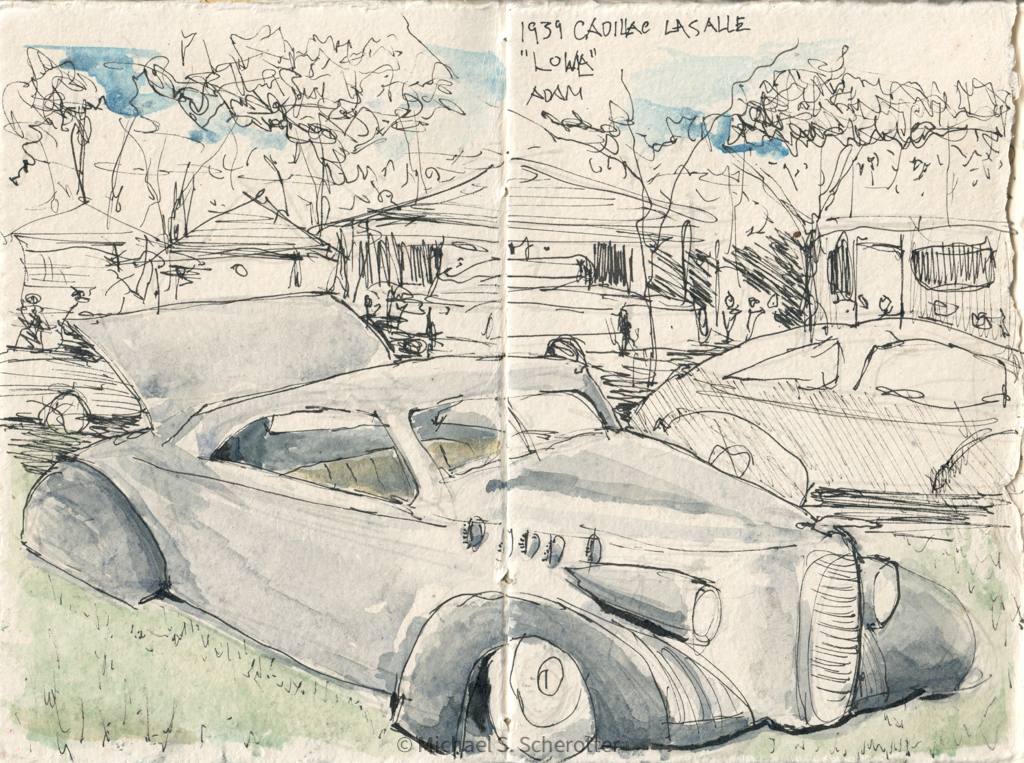
1939 Cadillac LaSalle “Lowla” by Adam
Then the photo albums came out. I heard stories about buying cars, inheriting cars, rebuilding, repainting, mixing parts from different cars and years, welding, hammering, hydraulics, adding A/C and modern sound systems. I do this to embed the stories in the paintings that I am making, as a way of remembering these priceless conversations. For me, these paintings each had 1,000 words.
I saw the 1:1 interaction that I was having time and time again similar to the type that I have had with musicians as I sketched them while they performed and then shared my sketch with them. In real-time, I am appreciating their artwork and they appreciate mine. In this case the cars are artwork, each one a unique instance of creativity and engineering expressed with welding torch, hammer, wrench, and mechanical devices. When I respond to their artwork with my artwork done with a pen and brush, I make a connection and I love that!
The first day of the show, I went around and did paintings across the Santa Maria Fairgrounds until I filled my journal. Many people came up to me who wanted to watch me paint and talk with me – asked me questions, see examples of my work. I met so many parents who were showing their kids that adults to artwork too – encouraging the children to keep at it. If they were interested in it, I would hand them a flyer about doing commissions from photographs of their cars.
Last page of my journal – time to order a new one from IonaHandcraftedBooks.com
The second day, having no more pages in my journal, I pulled out a pad of watercolor paper that had a grid of 25 1½” squares on it that I got at Case for Making in San Francisco and proceeded paint twenty five little sketches of cars around the show – each one took 5-10 minutes. This was a really fun exercise as the cars were so distinct, that even at a mini sketch, people at the show recognized the cars instantly.
My watercoloring kit2024 West Coast Kustoms Auto Show
In my career coaching, I use a design thinking methodology to help people craft an authentic career – similar to the method that Bill Burnett talks about in Designing Your Life. In the book, Burnett describes prototyping a career to see if it is a good fit. Over the past few years, I have been doing that for myself, in prototyping a coaching practice as well as a business in Galeryst which I built during a sabbatical while working at Microsoft in 2021.
An old Bulldozer in Sonoma
Generative AI
After leaving Microsoft earlier this year, I jumped into the world of Generative AI, joining Typeface as a product manager. At Typeface, I saw the awesome power and potential of generative AI when applied to creating content for sales and marketing. Using AI, Typeface gave marketers a creative super power. While at Typeface, Galeryst took a back burner for my creative energy, but the site still grew on autopilot with new galleries and subscribers, proving that people and organizations want a way to easily create 3D virtual galleries in the metaverse from their art collections.
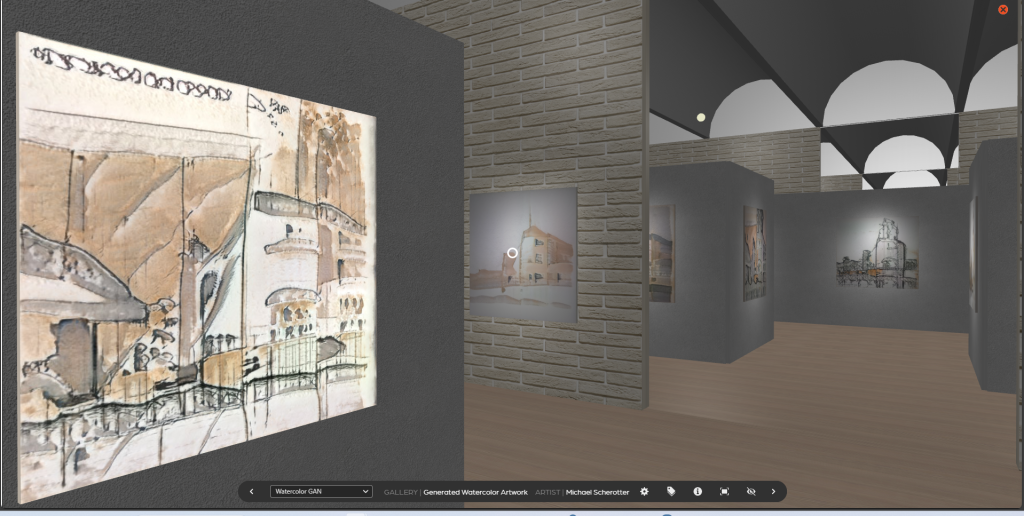
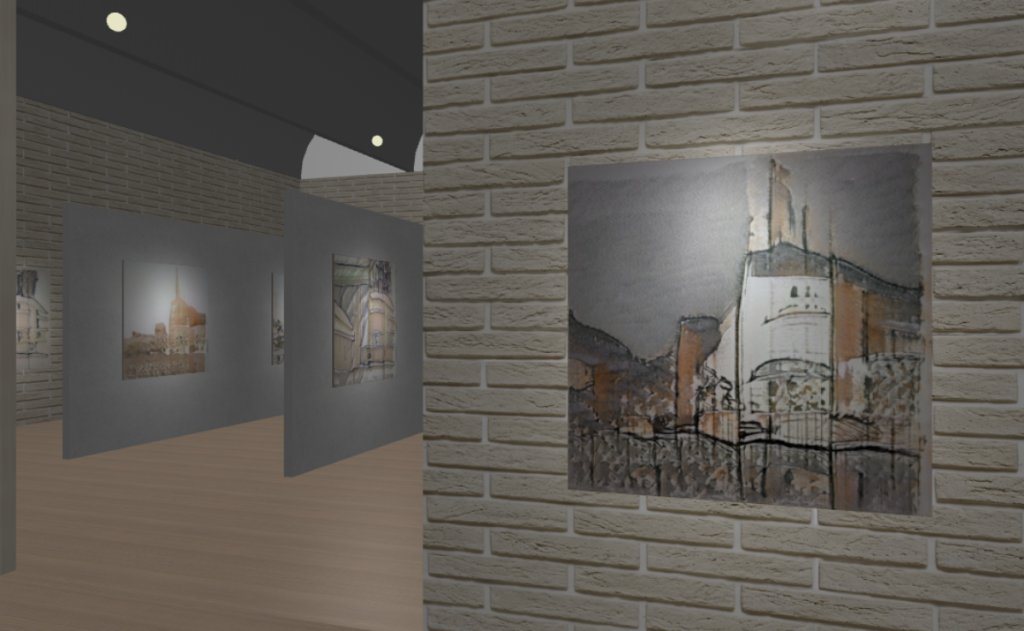
Artwork generated by AI (trained on my watercolors) placed in a virtual gallery.
Being exposed to Generative AI during this time, my creative ideas multiplied, especially around ways that I could use the technology to enhance and improve Galeryst which procedurally generates galleries from Adobe Photoshop Lightroom albums. Generative AI could super-charge Galeryst across many aspects of creating, sharing, and browsing art galleries. Seeing this amazing potential, I wanted to focus my creative energy on playing with the technology: experimenting, building, crafting, and collaborating with developers, technologists, artists, photographers, and gallerists. So, this week I left Typeface to go out on my own hoping to grow Galeryst with this transformative technology.
Galleries on Galeryst.com
A Mission
I found that while creating (drawing | painting | photography | modeling | coding), I also had a driving urge to help others create and be creative. I best articulated this in a personal mission statement that rounds out my style of creativity with coaching and mentoring as well:
I discover and craft connections linking creative processes that delight me with technologies that fascinate me, sharing the results to inspire and motivate others.
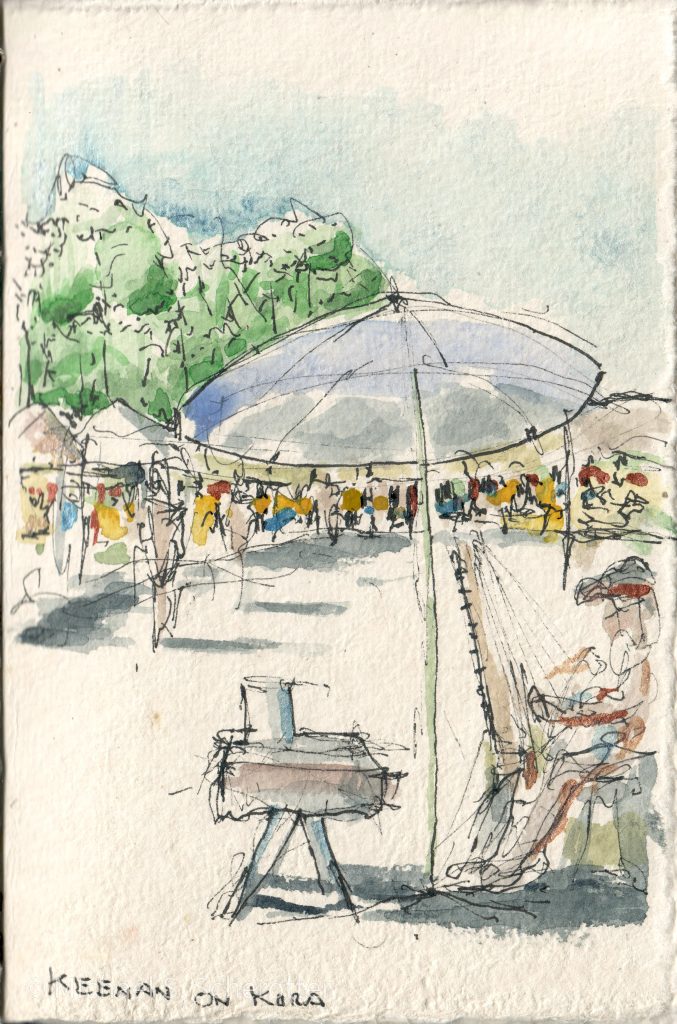
San Rafael Farmer’s Market
An Ensemble Career
Being true to that mission, my next career chapter will be an ensemble of activities including:
Improving and enhancing Galeryst with Generative AI, XR, and other exciting technologies
Coaching and mentoring people at all stages of their careers
Creating more artwork and exploring other creative mediums
Collaborating with technologists and artists to create beautiful works
If you are looking for a career coach to help you craft a creative/technology career, to help you review your resume, or prepare for an interview, schedule a free 30-minute chat with me.
If you want to setup a creative sync to share ideas and give each other creative feedback, reach out to me.
If you want to collaborate with me combining creativity with technology, reach out to me.
If you need help building technology solutions for media and entertainment, the cloud, AI, VR, XR, digital sketching, or creative tools, reach out to me.
We all have seen how artificial intelligence (AI) has been used with photography to do things like fix photographs in Adobe Photoshop, apply fun filters to photographs on Instagram, or transform a photograph to embody the style of a famous painting. The last example, style transfer, uses an AI model called a Generative Adversarial Network (GAN) and can also be used to generate entirely new images based on training it with a collection of images. This is what blew my mind this week.
I am part of a global organization at Microsoft, Commercial Software Engineering (CSE), where we help partners and customers with their most complex software engineering challenges by coding with them. The team is made up of software engineers, data scientists, and program managers like me who all love to hack and build stuff. We just completed a week-long hackathon combining virtual and in-person teams where individuals proposed ideas that interested them to work on and explore – in order to build a team to build something in less than four days.
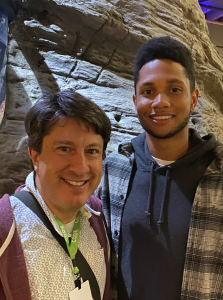
Meeting Paul
Michael and Paul
Paul Butler, a software engineer, recent Computer Science graduate, and CSE team member, proposed an idea to use a Style GAN 2-ADA to generate artwork. I had been learning about GANs and my colleague Kevin Ashley just published a book on creating art with AI – and that really peaked my interest. I had never met Paul before, but we quickly found a common thread and interest – as we both went to college in Arizona: he’s an ASU Sun Devil and I’m a UA Wildcat – and he’s super smart. Paul knew how to run the GAN using Python but he didn’t have a training image set to work from – and that’s where I was able to help.
30 Years of Artwork
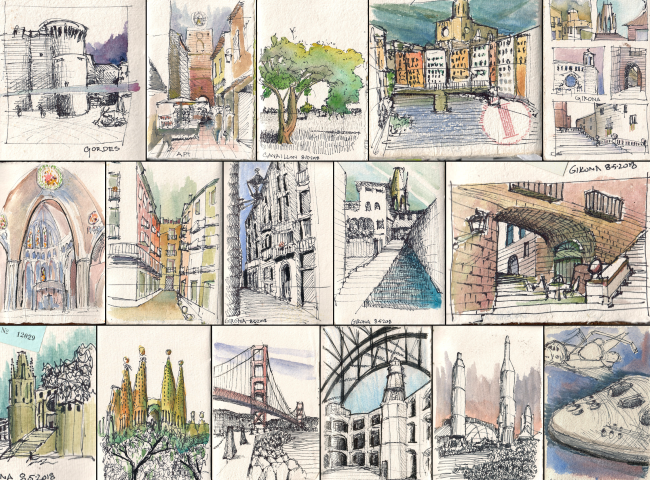
Ever since I started college studying architecture, I have been keeping visual journals of my artwork, taking a journal and compact supplies with me to document my journey when I travel for work or leisure. Having done this consistently for thirty years, I have filled more than 20 journals with drawings, watercolors, collage, pop-up craft, stickers, circuitry, and photographs. When the pandemic started and I had some time where I couldn’t travel, I scanned and categorized the pages using Adobe Photoshop Lightroom, adding dates, locations, and tags to the images identifying media and medium. Ending up with a collection of over 2,000 journal pages, I had tagged data set of imagery. I proposed to Paul that we use a subset of the pages, 315 of my watercolors, to train the GAN to make an AI that could create watercolors.
The Training set of 315 Watercolors
Watercoloring
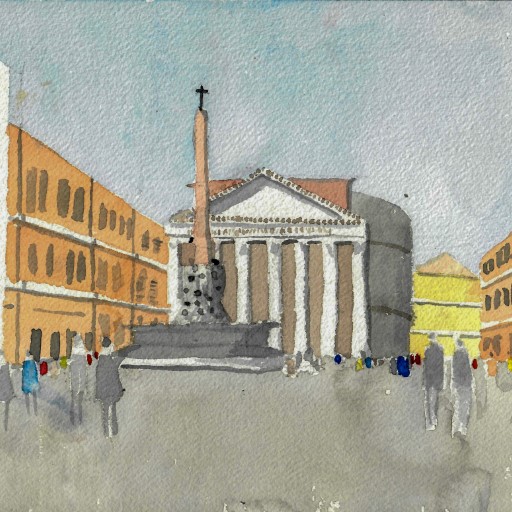
I had started watercoloring when I was 18 on a summer trip with Chuck Albanese, one of my architecture professors to sketch and watercolor in Italy and Greece. Watercoloring starts out hard as you learn to understand how to control the water and color, but like every skill you can get better at it with practice.
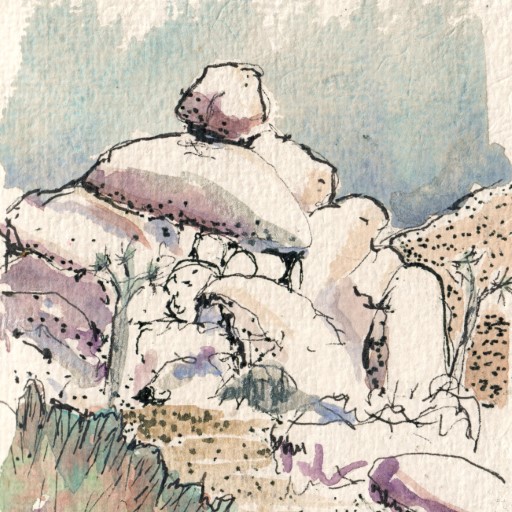
Pantheon, Rome in 1989Joshua Tree, CA in 2020
I had just finished my first year of architecture school where I learned from Kirby Lockard how to accurately draw freehand perspective, which is crucial in watercolor as a painting often start with a base drawing in pencil or pen. I loved watercoloring because it was portable and quick so I could take my creativity with me wherever I went and create something in as little as 15 minutes.
Travel watercolors during COVID lockdown via Microsoft Flight Simulator
Journals as Memento Collections
Ever since that trip, for more than thirty years, I’ve been sketching and watercoloring and with the Grail Diary from Indiana Jones and the Last Crusade as inspiration, I started using journals to record my journey, thoughts, and ideas and to collect the ephemera that I gather along the way. What I found is that while I am sitting somewhere creating artwork to go on a page of my journal, my mind is recording everything around me, the people I meet, the conversations I have, what else I observe, and my feelings. The artwork turns into a mnemonic for the moment, a memento. My journal is a serial collection of personal mementos that I can openly share with others, knowing that I don’t have to write a personal narrative to record it. When I look at a page in my journal years later, I instantly recall the experience from years earlier.
Adobe HQ, Noida, India
Training the GAN
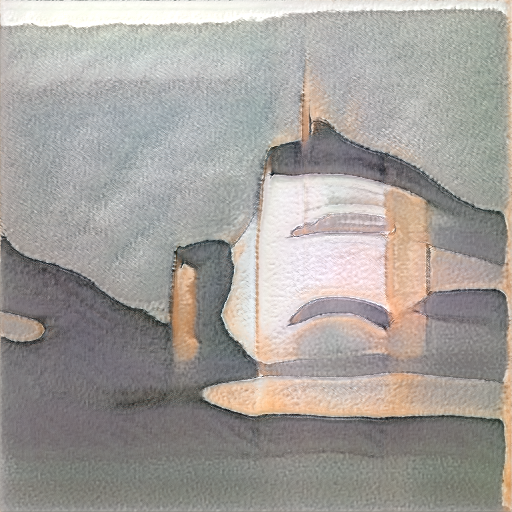
Paul started working on building the Python code to generate images and I started refining my watercolor collection, isolating the images on pages that had other content like line drawings, collage, and making a consistent collection of watercolors. Over the course of more than thirty years my style has evolved so there is a huge amount of variability in the collection, with the only common thread being that they were all watercolors and all created by me. Paul wrote the code so that a single numeric value from 0-999, a random number seed, would be the only input variable to generate each image. He ran the AI model for a few hours and we started seeing results come out of it and I was blown away!
#0278
Mementos in the Images
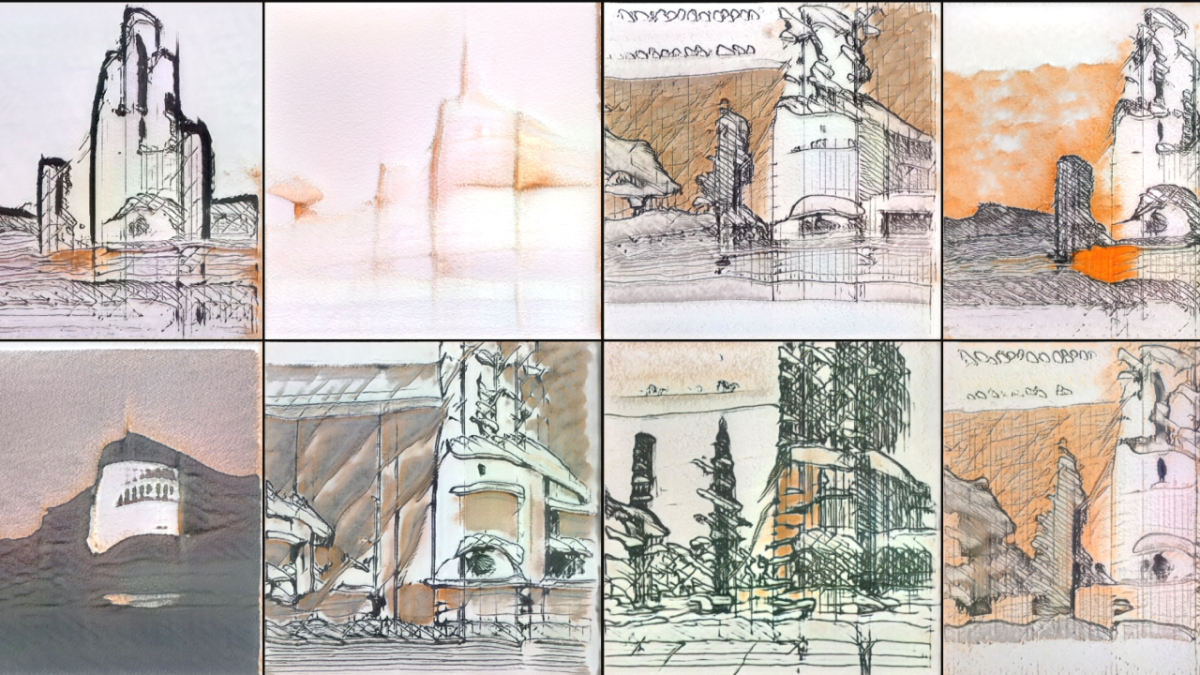
The AI found patterns and my techniques in the watercolor collection and started creating new unique abstract images that instantly triggered memories in me. I not only recognized elements in the images but those images triggered memories of the experiences that I had when creating them, combining these memories in a way that only happened for me in dreams. These images were mementos that spanned time and space.
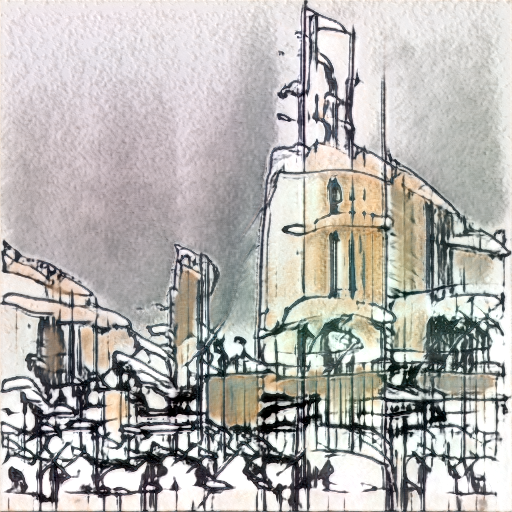
#0780
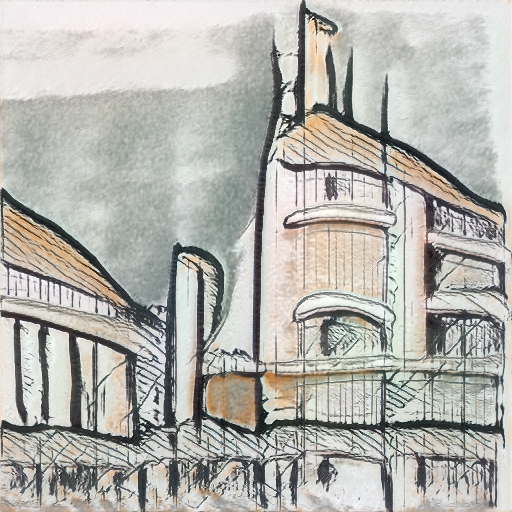
The image above, #0780 reminds me of the time that I took my son Sam, then 12, to a nude figure drawing session at the local art store five years ago, where we both spent the evening sketching and painting. As you might imagine, it was a memorable evening, and seeing this image, I was brought right back there. As many of my watercolors over the years have been of monumental architecture, there is a heavy influence on the AI model for that kind of subject. In this generated artwork, I also see a hint of the architecture of Antonio Gaudi, one of my favorite architects whose work is the subject of a number of the paintings in the training model.
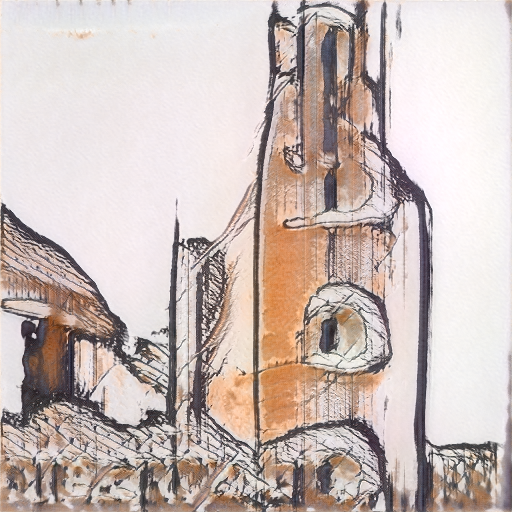
#0216
My Style in the Images
In the more than 1,000 generated images, I saw my style, composition, coloration, linework, and brushwork, but in very abstract forms, much more abstract than I’m comfortable with consciously doing in my work which today would be best characterized as Urban Sketching. Paul tells me that we can do much more to increase the variability, improve the quality, and refine the model. You will likely notice a recurring theme in many of the images of a monumental building on the right of the image; this is either an artifact of the AI model, or a hidden propensity for me to paint buildings on the right side of a watercolor – definitely an interesting direction for investigation. Paul is anxious to build a model against my whole corpus of artwork, which sounds like a very cool idea.
#0910
Putting the Artwork in a Gallery
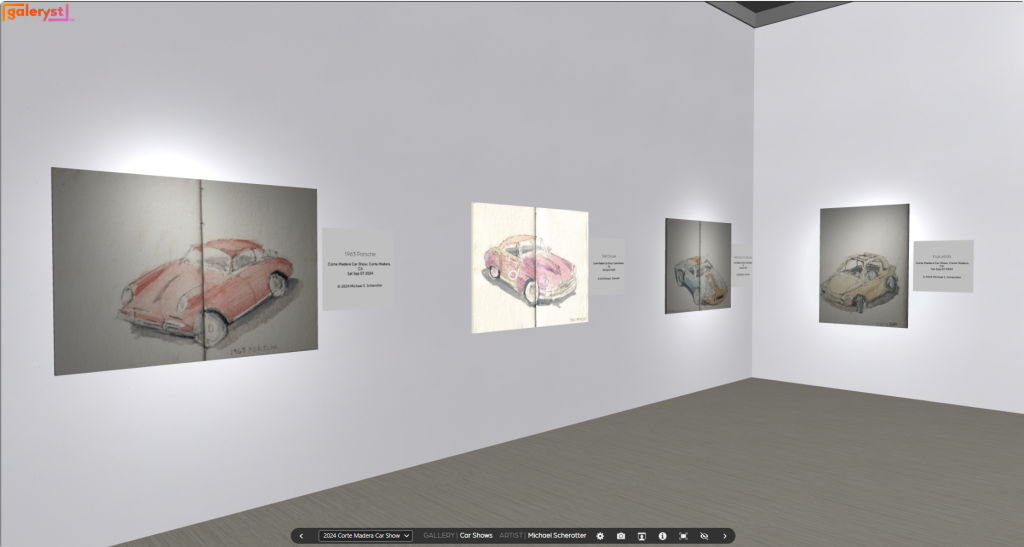
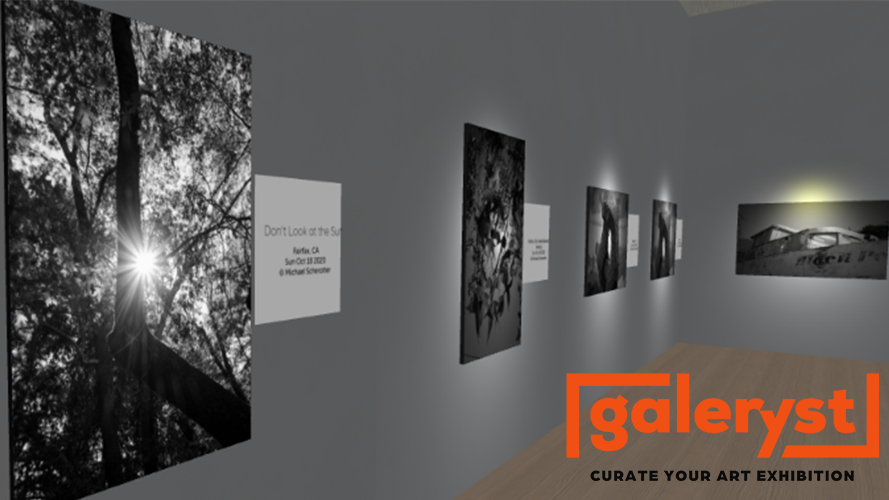
I took more than 200 of the generated images and put them in a virtual art gallery using my Galeryst site. Generated artwork in a generated gallery seems very appropriate. I originally created Galeryst to share my journals with others as bound journals don’t typically exhibit well in physical galleries.
Generated Watercolor Artwork on Galeryst
Sharing the Entire Collection
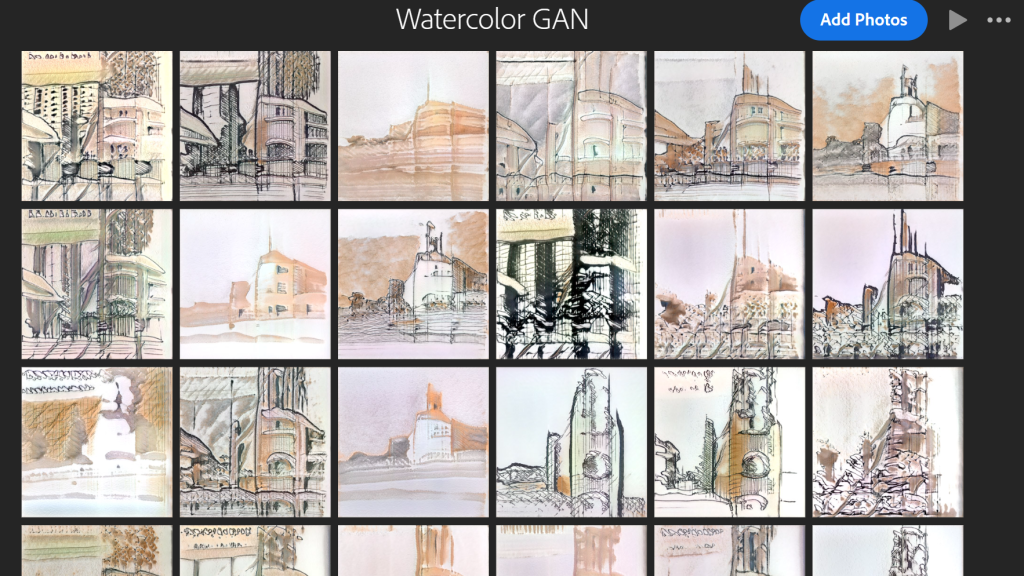
Generated Watercolors in Lightroom
I’ve shared the entire collection of generated watercolor artwork using Adobe Photoshop Lightroom because I want your feedback on the images. You can also see a slideshow of the entire collection on the Lightroom site as well if you click on the … in the upper right of the page. Here is the feedback I would love from you:
If you like an image, click on the ❤️ heart button in the lower left corner.
If an image reminds you of something or somewhere, please click on the 💬 comment button in the lower left and leave a comment.
#0843
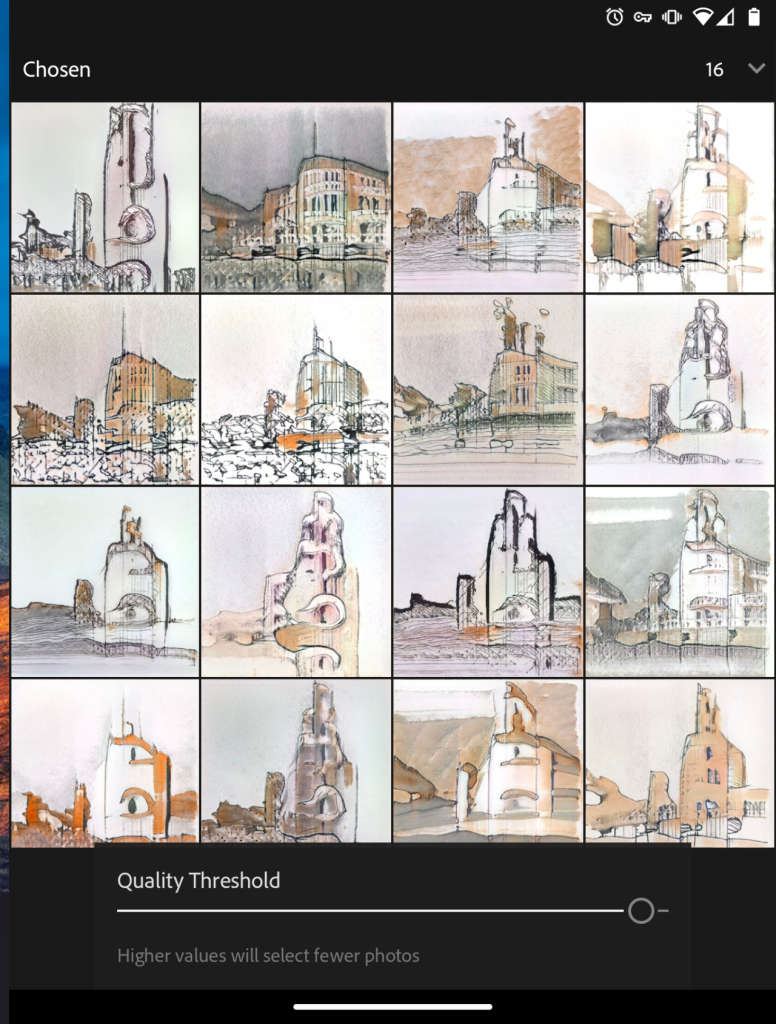
On Adobe Photoshop Lightroom Mobile, there’s a cool feature to “Choose Best Photos”. I ran the analyzer on the collection with a quality threshold of 16, and these are the top 16 that it picked:
Best 16 Photos as Chosen by Adobe Photoshop Lightroom
Galeryst is a new site that builds 3D galleries from your Adobe Photoshop Lightroom albums. We are looking for Lightroom users who are interested in trying it out in a private beta test before the site launches publicly. If you are interested, go to https://galeryst.com to apply to the beta program.
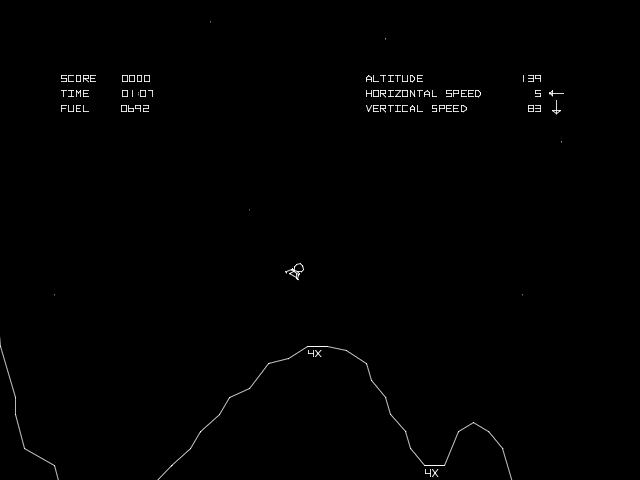
I look back at one of the first video games that I remember having fun playing: it was Lunar Lander created by Atari. Not only was it a game in the arcade which cost a shiny quarter per play, but it also ran on the TRS-80 computers in my schools computer lab which were free for me to use. I liked that deal especially as I was learning how to use BASIC programming to make the pixels move on the screen of those computers. For me, and many kids of my generation, computer games, very basic computer games, were our draw to computers. I poured through computer magazines which had listings of the BASIC code for games that I typed in, line after line. Debugging was going through the code again line-by-line until I found each of my typos. I then started on my own ideas: using a for/next loop, I was able to make a spaceship fly across the screen just like I saw the Kirk’s Enterprise accelerate to warp speed. I was hooked.
That’s how I started coding- that’s why I started my path in software at the age of 11 with games like Lunar Lander.
Lunar Lander
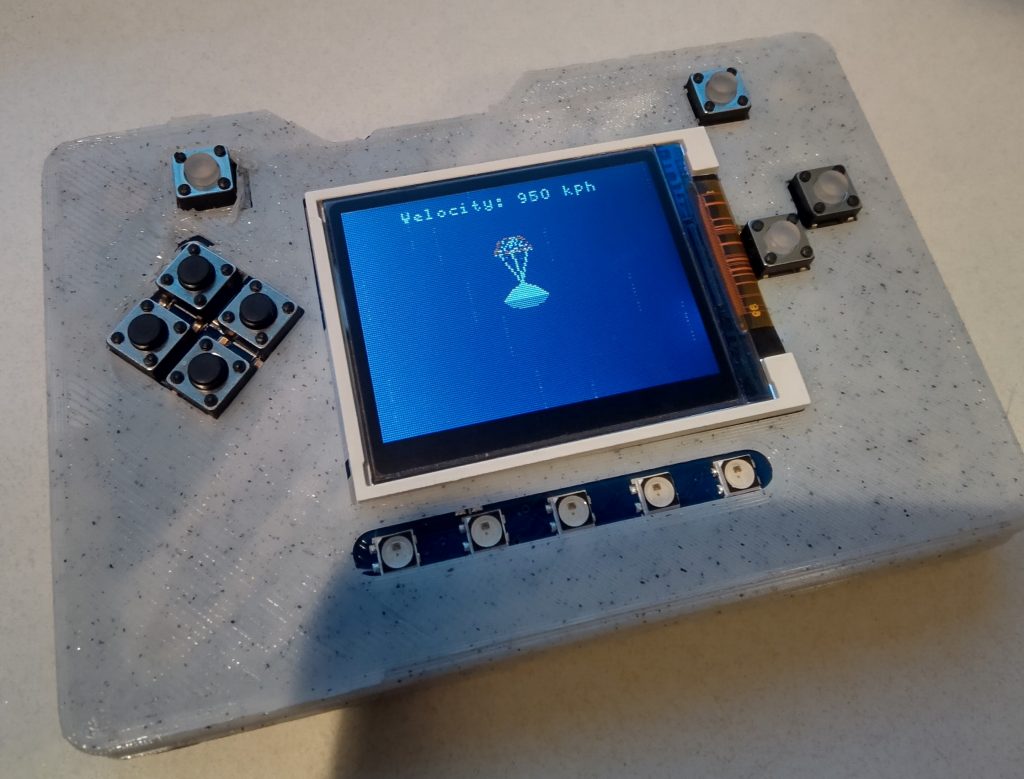
When I was sent an AdaFruit PyBadge by a colleague in December to experiment with, I immediately thought back about the games like Lunar Lander that inspired me as a young boy to start coding.
Adafruit PyBadge
The Adafruit PyBadge is a mini $34.95 computer that you can code with MakeCode Arcade, CirciutPython, or Arduino. You write the code on a computer and download it to the device which has a small color screen, buttons, lights, sensors, and a speaker, and various connectors to enable all sorts of other circuitry. I immediately thought of Lunar Lander but I also heard about the NASA Perseverance mission to Mars that was underway and thought I might try to create something similar for the Perseverance mission by the time it lands on Mars on 2/18/2021.
Once I started researching the mission, I realized that it was way more complex than the lunar lander. My challenge was to make a game around the landing of this rover on Mars. Here are the steps:
Capsule enters Mars atmosphere and decelerates with heat shield
Capsule slows down with parachute
Heat shield ejected
Lander drops out of capsule and starts rockets
Lander gets close to surface and lowers rover to ground with cables
Lander flies off
Rover starts it mission to explore Mars looking for signs of ancient life.
My mission was to create a game around that so I started building it with MakeCode Arcade, using the drag and drop interface to make something fun. MakeCode is a web-based programming environment for kids that can be used to program MineCraft, hardware devices like the BBC micro:bit, Lego Mindstorms and games. My first experience with MakeCode was to animate the BBC micro:bit on the bag I use for my journaling/art supplies, which I’ve shared on Thingiverse. MakeCode Arcade is a version of MakeCode that makes it easy to build games with sprites, animations, and interactivity. The beauty of MakeCode is that you can switch between the graphical block-based programming and the code view to see that they do the exact same thing – a great way to “graduate” to text-based coding.
I was able to get pretty far but I ran out of time as the actual Perseverance rover will land on Mars in two days. I’ve shared the source code so anyone could try it out and use it as a starting point for their own experimentation. The amazing part about the Perseverance mission is that the whole landing sequence will have to be done via computers without direct human controls, most likely with artificial intelligence, since the time it takes for radio signals to travel between Mars and the Earth is between 4.3 and 21 minutes.
The gameplay is this: once the lander is detached from the capsule, use the down arrow to slow the descent. Once close to the surface, press the A button to release the lander. The lander can then explore the surface of Mars by pressing the left and right button, pressing A again to send a pulse looking for water underground. That’s as far as I got with the time that I had. Anyone is free to tinker, modify, and adapt it, just please share with me what you do with it. I’d love to see where this goes.
I think that the possibilities for kids today to learn coding and build fun games that can be loaded onto a tiny computer is so cool. The block-based programming makes is so easy to learn the basic concepts of coding and creating fun games. I printed a basic case for the PyBadge with my 3D printer and here’s my Perseverance game playing on it.